When you’re getting new windows in Jacksonville, FL, you might not think much about what’s behind the trim. But that little bit of material, called flashing, is super important. It’s like a raincoat for your windows, stopping water from getting into your walls. Getting the flashing done right is a big deal, especially with Florida’s weather. This article talks about why proper flashing techniques are so important when replacing windows in Jacksonville.
Key Takeaways
- Proper window flashing is vital for preventing water damage and mold in Jacksonville homes, especially with frequent rain and humidity.
- Advanced techniques involve integrating flashing with weather and air barriers for a complete seal around window openings.
- Head flashing must be sloped for drainage and extend beyond the frame, with counter flashing for added protection.
- Jamb flashing needs to cover the full framing depth and overlap sill pans, while sill flashing should be integrated with the entire water management system.
- Options like liquid-applied membranes and self-adhering tapes offer continuous protection, but require careful installation and quality control.
Understanding Window Flashing Essentials
When you’re thinking about replacing windows here in Jacksonville, it’s easy to get caught up in the style, the energy efficiency ratings, or how much they’ll cost. But there’s a behind-the-scenes hero that doesn’t get enough credit: flashing. It might not be the most glamorous part of the job, but getting it right is super important for keeping your home dry and sound.
The Critical Role of Flashing in Jacksonville Homes
Jacksonville’s climate means we deal with a lot of rain, and sometimes strong winds that can drive that water where it shouldn’t go. Windows, by their very nature, create openings in your walls. These openings are prime spots for water to sneak in if they aren’t properly protected. Flashing acts as a critical barrier, directing water away from the window opening and back to the exterior of your home. Without it, water can seep into your wall cavities, leading to all sorts of problems like wood rot, mold growth, and damage to your insulation and interior finishes. It’s like giving your windows a raincoat that actually works.
Preventing Water Infiltration Through Openings
Think of your home’s exterior as a system designed to keep the weather out. The walls and roof are the main lines of defense, but doors and windows interrupt that defense. These openings are the weak links. Proper flashing techniques create a continuous path for water to travel down and away from these vulnerable spots. It’s not just about the window itself; it’s about how the window integrates with the rest of the wall system. If flashing isn’t done right at the head (top), jambs (sides), or sill (bottom) of the window, water can find its way in. This can happen even with the best quality windows if the surrounding protection isn’t up to par.
Holistic Approach to Flashing Solutions
It’s really about looking at the whole picture when it comes to flashing. You can’t just slap some tape around a window and call it a day. We need to consider the type of wall construction we’re dealing with, the specific windows being installed, and how the flashing will work with other water and air barriers. It’s about making sure everything connects properly to create a complete shield against water. This means paying attention to details like:
- How the flashing integrates with the house wrap or building paper.
- The type of materials used for flashing – metal, flexible membranes, or even liquid-applied products.
- How the flashing is installed to create a continuous, leak-proof system around the entire opening.
When we talk about flashing, we’re not just talking about a single piece of material. It’s a system of components working together. Each part, from the head flashing to the sill, needs to be installed correctly and connect with the next piece to prevent any gaps where water can get through. It’s a bit like building a puzzle where every piece has to fit perfectly to keep the water out.
Advanced Flashing Techniques for Durability
Integrating Flashing with Weather and Air Barriers
When we talk about making sure your new windows in Jacksonville stand up to the elements, it’s not just about the window itself. It’s about how the whole wall system works together. Think of flashing as the first line of defense, but it works best when it’s part of a bigger plan. This means making sure your flashing plays nice with the weather-resistant barrier (WRB) and the air barrier. These layers are designed to keep water out and stop unwanted air from getting in, and the flashing needs to connect with them without any gaps. A continuous barrier system, from the bottom sill to the top head flashing, is key to preventing water from finding its way into your home’s structure.
Choosing Durable Metal and Flexible Flashing Products
There are a bunch of options out there for flashing materials, and picking the right one makes a big difference in how long it lasts. You’ve got your traditional metal flashings, like aluminum or galvanized steel, which are strong and reliable, especially for areas that get a lot of direct water. Then there are the newer flexible options, often made from advanced acrylics or butyl rubber. These are great because they can stretch and conform to tricky corners and curves, which are often weak spots for leaks. Some of these flexible tapes are designed to stick really well to different building materials, even sheathing that’s meant to work with your air barrier.
Here’s a quick look at some common choices:
- Metal Flashing: Durable, rigid, good for large areas and corners. Can be prone to corrosion if not properly coated or maintained.
- Flexible Tapes (Acrylic/Butyl): Conformable, good for complex shapes, often self-adhering. UV resistance and adhesion strength vary by product.
- Liquid-Applied Membranes: Seamless, can fill irregular surfaces, good for difficult-to-reach areas. Requires careful application for consistent thickness.
Ensuring Continuous Barriers Around Openings
Getting that continuous barrier around your windows is where the real skill comes in. It’s not enough to just slap some flashing tape on. You need to think about how it overlaps and seals at every junction. For example, the flashing at the bottom sill needs to work with the sill pan, and the side jamb flashing needs to overlap the sill flashing correctly. Then, the head flashing has to overlap the jamb flashing. This ‘shingling’ effect is super important – it means water that gets behind the siding will run down the outside of the flashing layers, not into your wall. Using the right width of flashing tape or applying liquid-applied flashing with the correct overlap is critical. The goal is to create a water-tight pathway that directs any moisture away from the building’s structure and out to the exterior.
When you’re installing new windows, especially in a place like Jacksonville with its humidity and rain, the details matter. It’s easy to think of flashing as just a strip of material, but it’s really a carefully designed system. Making sure it integrates properly with your home’s other protective layers, like the house wrap and air barrier, is what stops problems before they start. Skipping steps or using the wrong materials here can lead to costly repairs down the road, so it’s worth getting it right the first time.
Proper Installation of Window Head Flashing
Sloping Head Flashing for Effective Drainage
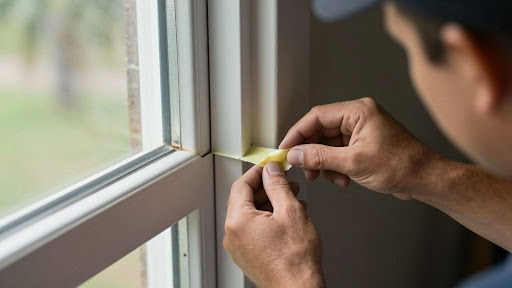
The top of any window, known as the head, is the first spot to catch water that runs down from above. It’s super important that this water gets directed away from the window, not into it. Properly sloped head flashing is your best defense here. Think of it like a tiny roof over your window. This flashing needs to tilt slightly outwards so water naturally flows away from the building. It should also have a drip edge that hangs over the top of the window frame, making sure water drips clear and doesn’t sneak back in.
Extending Flashing Beyond the Window Frame
Don’t skimp on how far the head flashing extends. It needs to go several inches past the sides of the window frame. This extra bit gives water a clear path to the ground, preventing it from seeping back into the wall assembly behind the window. If your window opening doesn’t allow for this kind of extension, like with some recessed windows, you might need to use a double bead of sealant to catch water and guide it to the side flashing instead.
Counter Flashing Window Head Details
Above the main head flashing, there’s usually an upturned leg, about 4 inches high, that sits against the wall. This part needs to be covered by a waterproof membrane that’s attached to this leg. This is called counter flashing. It creates a continuous seal, stopping water from getting behind the head flashing and into the wall. Even if your window comes with its own built-in flashing, you still need to check if it meets these requirements and if counter flashing is necessary to protect the sheathing underneath.
Securing Window Jambs and Sills
Making sure the window jambs and sills are sealed up tight is a must for keeping out rain and dampness. If you skip steps here, you could end up dealing with hidden water damage later on. Let’s walk through each key area step by step.
Addressing Critical Jamb-to-Head Junctions
The spots where the jamb (side of the window) meets the head (top) are notorious for water leaks. This spot often gets overlooked, but water loves to sneak in wherever materials meet.
- Apply flexible or metal flashing, wrapping it up from the jamb to the head, fully covering the intersection.
- Use a single piece when possible—fewer seams mean fewer weak points.
- Make sure the flashing is tight against the sheathing and seals any gaps.
Focusing on these connections first will help head off leaks long before they become a big problem inside your walls.
Extending Jamb Flashing for Water Redirection
The best way to steer water away is by extending the jamb flashing all the way down to overlap with the sill pan at the bottom.
- Overlap flashing layers so water runs downwards, not inside.
- Fasten the flashing securely—don’t rely just on adhesives, especially on rough or uneven walls.
- Use compatible materials to avoid gaps; mix-and-match can sometimes cause peeling or separation.
Table: Window Jamb Flashing Approaches
| Flashing Material | Durability | Typical Use |
| Flexible Membrane | Moderate | Most standard jambs |
| Metal | High | High-exposure areas |
| Liquid-Applied | Moderate | Odd-shaped openings |
Shingling Jamb Flashing Over Sill Pans
This is the finishing touch at the bottom of the window. Shingling means layering materials the same way roof shingles work: water runs out and away, not into joints.
- Place the jamb flashing over the edge of the sill pan flashing so water always exits over the surface.
- Never let the sill pan get covered up by jamb material—water will back up and sneak inside.
- Seal any fastener holes to hold the barrier together.
When done right, your window openings can put up with Jacksonville’s rain for years, no matter how many storms roll through.
Overall, paying close attention to each step—especially at the junctions and overlaps—will help your window replacement hold up better over time. It’s not just about the window looking good; you want it to stay dry and sound as well!
Innovative Flashing Product Options
When it comes to keeping your Jacksonville home dry and comfortable, the type of flashing you use around your new windows really matters. Gone are the days when it was just about a piece of metal. Today, there are some pretty neat products out there that make the job easier and, honestly, work a lot better. We’re talking about things that can seal up those tricky spots without any fuss.
The Benefits of Liquid-Applied Flashing Membranes
Think of liquid flashing like a high-tech paint that hardens into a waterproof barrier. You can brush or roll it right onto the sheathing, framing, or even metal around the window opening. It’s great because it flows into all the nooks and crannies, creating a solid, continuous seal that stops water and air from getting in. This is especially handy for windows that aren’t perfectly square or have lots of little details. Some of these products can even handle being applied to damp surfaces or if it starts to rain shortly after you put them on. Plus, they often cure pretty fast, so you can get the window installed the same day.
- Forms a seamless, void-free barrier.
- Adapts to irregular shapes and complex openings.
- Can be applied in less-than-ideal weather conditions.
- Often dries quickly, speeding up installation.
Liquid flashing is a game-changer for creating a reliable seal around windows. It’s flexible and can handle the bumps and curves of a real-world building project, unlike some older methods that might leave tiny gaps.
Utilizing Self-Adhering Roll-Tape Flashing
Another popular choice is self-adhering flashing tape. This stuff comes in rolls, kind of like really strong, sticky tape. You just peel off the backing and press it into place around the window opening. It’s designed to stick really well and create a good seal. It’s pretty straightforward to use, which can help keep installation costs down. The key here is making sure it’s applied smoothly with no wrinkles and that it adheres properly to the surface. Some tapes are made to work with specific house wraps or sheathing, so it’s good to check for compatibility.
Advantages of Integrated Flashing Systems
This is where things get really streamlined. Integrated flashing systems often combine the flashing, air barrier, and water-resistive barrier into one coordinated package, usually from a single manufacturer. This means all the parts are designed to work together perfectly. It simplifies the whole process for the builder and can make warranty claims a lot easier to handle. If there’s ever an issue, you’re not trying to figure out which of the many products failed; it’s all covered under one system. This approach helps ensure a continuous barrier around the entire opening, reducing the chances of leaks down the road.
Quality Control and Warranty Considerations
Importance of Trained Applicators for Liquid Flashing
When you’re looking at liquid-applied flashing, the person doing the work really matters. It’s not like just slapping on some paint. This stuff needs to be applied evenly, with the right thickness, and you’ve got to make sure it seals up all the nooks and crannies. If it’s too thin in spots, water can sneak through. If it’s applied unevenly, you might have weak points. Getting someone who knows what they’re doing with these products is key to making sure it actually works like it’s supposed to. It’s one of those things where the skill of the installer directly impacts how well the flashing performs over time, and that’s something you don’t want to mess around with, especially here in Jacksonville with our weather.
Ensuring Uniform Bonding with Roll Tapes
Roll-tape flashing is pretty straightforward, but you still need to pay attention. The main goal is to get a good, solid bond between the tape and the surface it’s sticking to. This means the surface needs to be clean and dry. You also want to press the tape down firmly, working out any air bubbles. Think of it like putting on a really strong sticker – you want it to stick everywhere, no lifting. If you don’t get a good seal, you’re basically leaving the door open for water to get in. It’s about making sure that tape is one solid piece of protection, not a bunch of little pieces that might peel up later.
Simplifying Warranties with Single-Manufacturer Systems
Sometimes, when you have different companies making different parts of your window system – like one company for the window, another for the flashing tape, and maybe a third for the sealant – it can get complicated if something goes wrong. Who’s responsible? It can turn into a blame game. That’s why some people like to use systems where all the parts, including the flashing, come from the same maker. This way, there’s usually one warranty that covers everything. It makes things a lot simpler if you ever need to make a claim. You know exactly who to call, and they can’t point fingers at another company’s product.
When it comes to protecting your home from water, especially in a place like Jacksonville, the details really count. It’s not just about picking the right window; it’s about how it’s installed and sealed up. Proper flashing is a big part of that. If the installation isn’t done right, or if the materials aren’t up to par, you can end up with leaks and damage down the road. That’s why paying attention to the quality of the work and the warranties offered is so important. It gives you peace of mind knowing your investment is protected.
Here’s a quick look at what can go wrong with improper installation:
- Visible Gaps: You can see spaces around the window frame where water could get in.
- Drafts: Feeling cold air coming in around the window means the seal isn’t tight.
- Condensation: Too much moisture between the glass panes or on the frame suggests a bad seal.
- Water Stains or Mold: These are clear signs that water is getting where it shouldn’t be.
- Difficulty Operating: Windows that stick or are hard to open might be misaligned due to poor installation.
Wrapping It Up
So, when you’re thinking about getting new windows here in Jacksonville, don’t forget about the flashing. It might not be the most exciting part, but getting it right is super important. Good flashing stops water from getting where it shouldn’t, which means fewer headaches down the road with mold or damage. Whether you go with integrated systems or specific products, the main goal is to keep your home dry and sealed up tight. It’s a small detail that makes a big difference in the long run for your home’s health and your peace of mind.
Frequently Asked Questions
Why is window flashing so important in Jacksonville homes?
Jacksonville homes can get a lot of rain and humidity. Flashing is like a raincoat for your windows. It’s a special material that stops water from getting into your house through the window openings. Without good flashing, water can get in, causing damage like mold or rotten wood, which can be expensive to fix.
What’s the main job of flashing around windows?
The main job is to keep water out! Think of it as a barrier. When rain hits your house, the flashing guides the water away from the window and the wall. This prevents leaks and protects the structure of your home from water damage.
What are the different types of flashing materials?
There are a few kinds. Some are made of strong metal, like copper or stainless steel, which are very durable. Others are flexible membranes, like special tapes or liquid coatings that you can paint or spread on. The best choice often depends on the type of window and how the house is built.
How does flashing work with other parts of the house, like walls?
Flashing needs to work together with other layers of your house, like the weather barrier and air barrier. It’s important that these layers connect smoothly. This creates a complete shield against both water and air, making your home more energy-efficient and protecting it better.
What makes a good window flashing installation?
A good installation means the flashing is put on correctly and covers all the right spots. For example, the flashing at the top of the window (the head flashing) needs to slope so water runs off. The sides (jamb flashing) need to connect properly to the top and bottom. Everything needs to seal up tight to prevent leaks.
Are there new types of flashing that are easier to use?
Yes, there are! Liquid-applied flashing can be painted or spread on, creating a seamless barrier that’s great for tricky spots. Also, self-adhering tapes are like strong stickers that stick well and are easy to apply without special tools. These new options can make installation quicker and more reliable.